After setting up your loyalty program, it’s time to display that information to your customers.
Styling options
Go to the following page to set styling options :
WordPress Admin
Admin menu
MyRewards
Menu entry
Appearance
Page
Styling
Tab
There are various styling options to set here. Every change you make will reflect on the preview. Most elements you can display on the frontend will use these styling options. Therefore, make sure they match your website’s design.
As a general rule, all elements displayed on front-end are set in the appearance section of the plugin’s admin interface
You can now move on to setting up front-end elements.
WooCommerce Display
MyRewards gives you a lot of control over the content you can display on the cart and checkout pages. The principle is that we let you set the content you want at different locations in the cart and checkout pages.
Since you have total control over the content, you can use this feature to display information unrelated to your loyalty program.
To display dynamic content, you’ll have to use shortcodes. For more information about available shortcodes, check the shortcodes page below.
Cart Page Content
To add content to your cart page, go to the following settings page :
WordPress Admin
Admin menu
MyRewards
Menu entry
Appearance
Page
WooCommerce
Tab
Cart Page Content
Group
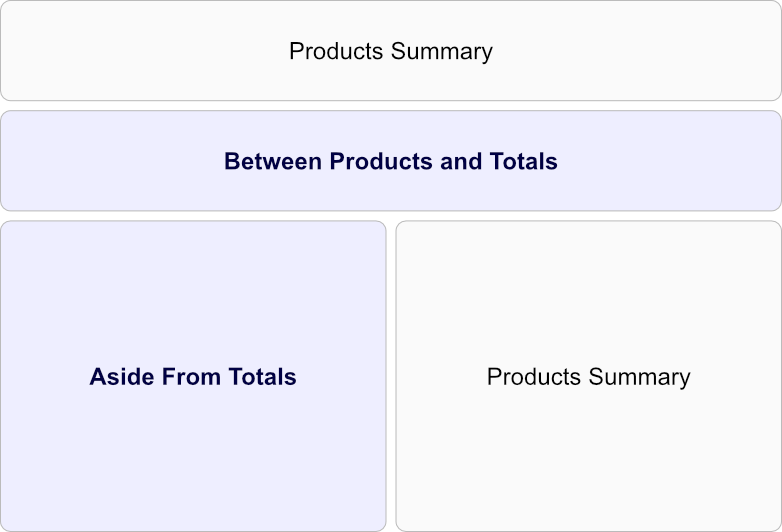
Once you’re there, you will see 2 different text fields where you can set your content, named Between Products and Totals and Aside from Totals. Here’s a graphic representation of these areas in the cart page :
Cart Page Content Areas
In each area, you can set the content you want. You will find some advise on the content to set down below.
Checkout Page Content
To add content to your checkout page, go to the following settings page :
WordPress Admin
Admin menu
MyRewards
Menu entry
Appearance
Page
WooCommerce
Tab
Checkout Page Content
Group
Once you’re there, you will see 3 different text fields where you can set your content, named Top of the page, Before Customer Details and Before Order Review. Here’s a graphic representation of these areas in the checkout page :
Checkout Page Content
My Account Page (Pro)
In the free version, you can’t display a loyalty dashboard in the user’s “My Account” Page. This feature is only available in the Pro Version.
Shortcodes you should use
In each area, you can set the content you want. However, there are some shortcodes that you should definitely consider using in these pages :
Points on Cart
If you want your customers to spend their points for immediate discounts, you need to use this shortcode on the cart page.
[wr_points_on_cart]
Available Coupons
If your customers have unlocked coupon rewards, you can list them and give the possibility to apply them on the cart
[wr_available_coupons buttons="true"]
Shortcodes
MyRewards provides different shortcodes you can use on your website to display loyalty information to your customers. Here’s how to use them
Points Balance
Use this shortcode to display their points balance to your customers. Use the following options to change how the balance is displayed.
[wr_points_balance]
In addition, there are some options you can use with this shortcode
element : (Optional) Select how the points balance element is displayed. 3 possible values :
none : Default Value. Simple text without stylable elements
tile : Stylable tile with a background color
line : Horizontal display in stylable elements
display : (Optional) Select how the points are displayed. 2 possible values :
formatted : Default Value. Points are formatted with the points currency/name
simple : Only the points balance numeric value is displayed
showname : (Optional) If set, will force the display of the points and rewards system name
Available Coupons
Use this shortcode to display a list of their available coupons to your customers.
[wr_available_coupons]
In addition, there are some options you can use with this shortcode
layout : (Optional) Select how to display the coupons list. 4 possible values :
vertical : Default Value. Displays elements on top of each other
horizontal : Displays elements in a row
grid : Displays elements in a responsive grid
none : Displays elements without wrapping containers
element : (Optional) Select how to display a coupon element. 3 possible values :
none : Simple text without stylable elements
tile : Stylable tile with a background color
line : Default Value. Horizontal display in stylable elements
buttons : (Optional) If set to true, the shortcode adds apply buttons on each element to apply the coupon on the cart. Default is false
Points Value
Use this shortcode to display how much points are worth. This only works if your points and rewards system is set to points on cart.
[wr_points_value]
In addition, there are some options you can use with this shortcode
text : Text to display before the points value
raw : (Optional) If set to ‘true’, the result will be a simple text. If not, the result will be embedded in a stylable DOM element
Points History
This shortcode displays a user’s points history.
[wr_show_history]
In addition, there are some options you can use with this shortcode
count : (Optional) The number of rows to display. Default is 15.
columns : (Optional) The Columns to display (comma separated). The order in which you specify the columns will be the grid columns order. If not specified, the history will display the points and rewards system name, date, reason and points movement columns. Here are the different options available :
system : The points and rewards system’s name.
date : The date at which the points movement happened.
descr : The operation’s description.
points : The amount of points earned or lost during the operation.
total : The new total of points in the user’s reserve at the end of the operation.
headers : (Optional) The column headers (comma separated). Must be specified if you specified the columns option. The headers must respect the same order than the ones of the previous option.
Points on Cart Tool
Use this shortcode to display the points on cart tool
[wr_points_on_cart]
In addition, there are some options you can use with this shortcode
reload : (Optional) Set it to true to force a page reload when customers modify the points they want to apply on the order
layout : (Optional) Select how the tool is displayed. 3 possible values :
horizontal : Default value. Elements are displayed in one line
vertical : Elements are displayed on top of another
half : If you present this tool next to the cart totals block, use this option to display the tool vertically with some spacing
Maximum Point Amount on Cart
This shortcode will show the maximum quantity of Point that could be used on this cart.
[wr_max_points_on_cart]
In addition, there are some options you can use with this shortcode
raw : (Optional) If set, the amount will be a simple text. Otherwise, it will be presented inside a stylable element
Referral Link
Use this shortcode to show a referral link button. Customers can use then share this link with their friends.
[wr_referral_link]
In addition, there are some options you can use with this shortcode
mode : Select the type of referral link your customers will get :
link : Default Value. Customers will get an url link
qrcode : Customers will get a QR Code link
showlink : (Optional) If set, customers will see the referral link or QR-Code above the copy button
showbutton : (Optional, default is ‘true’) Show or hide the copy button
url : (Optional) By default, the shortcode shares the url of the page it’s displayed on. You can override that setting by setting an url in this option.
button : (Optional) Set the text customers will see on the copy button
copied : (Optional) Set the text customers will see when the code is copied to the clipboard
Emails
WooRewards sends informative emails about their actions in your loyalty program. Therefore, they are not classified as advertising emails and don’t require an unsubscription link.
You can customize emails sent to your customers. In addition, you can disable emails if you don’t want to send them.
Go to the following page :
WordPress Admin
Admin menu
MyRewards
Menu entry
Appearance
Page
Emails
Tab
Header and Footer
You will see 2 options to set :
Header picture : Set the header picture that will be displayed on top of your emails.
Footer text : Set the text you want to display on the footer of all emails. You can add links.
The width of most emails is 600 pixels. So, this is the width you should use for your header image.
New Reward Email
Customers will receive this email every time they unlock a new reward in your Points and Rewards System.
Set the following options :
Subject : The mail’s subject. Choose a title that will draw your customer’s attention.
Preheader : This short text (50-100 characters) is very useful. Most email clients will display this text right under the email subject before the recipient opens it. Therefore, it will help you to get your customer’s attention.
Enabled : Decide if you want to send this email to your customers or not when they unlock a new reward.
Styling Tool : Use the provided styling tool to customize the appearance of the email. You can modify some texts and add your own html code in some areas.
In the styling tool, you see a test reward that represents what an earned reward will look like when the email is sent to customers. So, if you want to see how the real email will look like in your existing loyalty program, simply give yourself a reward in the customers management screen.
Under the email customization tool, you have the possibility to send a test email to the email address of your choice. Simply fill the email address and click on the Send test email button.