If you install a lot of different plugins on your WordPress website, you will experience some inconsistencies in your website presentation. You may also want to add your own styles or tweak some elements a bit. In this guide, we’ll learn how to customize the style of a WordPress page. To that end, you will need do add some custom CSS code to your website. We’ll see how to add custom CSS styles and the general rules to respect when you do it. However, we won’t cover what CSS is. If you’re not familiar with CSS, you can refer to this documentation.
1|Open the customizer
First, you want to be able to add some custom CSS to your pages. Go to one of your website pages and, on the top bar, you’ll see a customize button.

This will open a new page with the same content as before but with new options on the left. Go down until you see the Additional CSS option. Click on it and an input will appear where you can put your CSS.
2|Find the element you want to style
Now that you know where to add your CSS code, it’s time to find the element you want to style. Into your page, go down until you see one of the elements you want to modify. Once you find it, right click on it and select “Inspect” (the word may differ in some browsers). It will open up a new sub-window in your browser. It may look a bit scary but here’s the information you should look at :
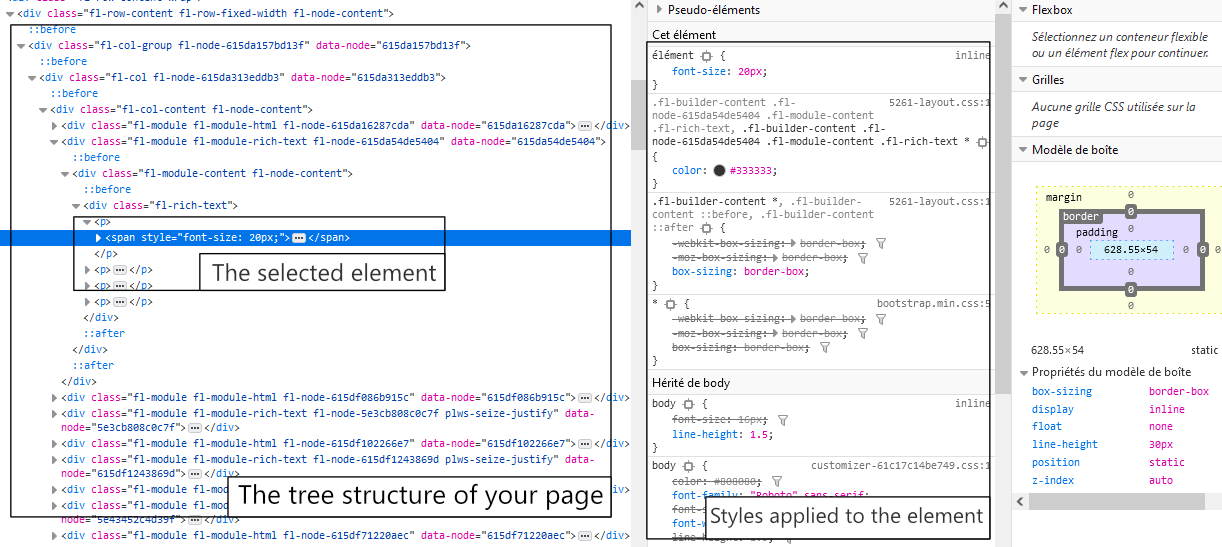
As you can see, there are many styles applied to a single element. You can also see that some lines are crossed out. To understand why this happens and how to make sure your styles will apply, we’ll talk a bit about CSS specificity.
3|CSS Specificity
In CSS, you can have a lot of rules that apply to a single element. You can even have the same rule that applies multiple times. As a result, only the rule with the highest specificity will apply. This is why, when adding custom styles to your wordpress pages, you need to set a higher specificity than the existing styles.
First, let’s explain what specificity is. Secondly, we’ll see some examples of how it works.
Specificity : Score/rank that determines which style declarations are ultimately applied to an element.
Here are the scores for different style declarations :
Example
This may seem a but confusing but it’ll become much clearer with some examples. Let’s take the following html :
<div class="first-class">
    <span class="second-class" id="my_super_span">This is my super span</span>
</div>
Now, let’s create 4 different style declarations and see what styles apply in the end.
span{
    /** Specificity : 1 → Only one element */
    color:#666666
}
.first-class span{
    /** Specificity : 11 → One class and one element */
    padding:15px;
    color:#333333;
}
.first-class .second-class{
    /** Specificity : 20 → Two classes */
    padding:10px;
}
#my_super_span{
    /** Specificity : 100 → One ID */
    color: #66aacc;
}
In the above code, we have styles that change the color and the padding of our span element. Let’s look at each one
1|padding
There are 2 padding declarations, one with a specificity of 11 and one with a specificity of 20. The higher specificity will apply and the final padding will be :
padding:10px;2|color
There are 3 color declarations with specificities of 1, 11 and 100. Like before, the higher specificity will apply and the final color will be :
color: #66aacc;Now that we’ve seen how specificity works, you should be able, for each element you inspect, to find what is the higher specificity that applies to it and what specificity you must reach to override the existing values.
4|Some examples
In this part, we’ll see some examples on how to customize the style of a wordpress page. These are the most common modifications you may want to make on your WordPress pages elements.
1|Hide an element
To hide an element, you must use the display:none CSS rule. Here’s how you can apply it :
.my_high_specificity_declaration {
    display:none;
}
This is pretty straightforward. This declaration will hide the element from the page.
2|Add a background color and some spacing
.my_high_specificity_declaration {
    background-color: #666666; // Dark Grey
    color: #ffffff; // White
    padding: 20px; // Spacing
    border-radius: 4px; // Small rounding on the edges
}
With this example, you’ll wrap the content of your element in a frame with a 20 pixels spacing, a grey background and a white text.
Browse our Plugins
Didn't you know ? We're writing awesome blog posts but we also sell fantastic plugins made with love ! Don't hesitate to take a look at them as they can really boost your online activity.